
By Gurbaj Singh · Reviewed 1 November 2026
Reviewed 6 October 2026 against Sender’s official WooCommerce and integration documentation.
Connecting Sender to WooCommerce is more than installing a WordPress plugin. A useful setup must transfer the right customer records, preserve consent, capture cart and purchase events, place contacts into the correct Sender groups, and prove that each automation starts and stops when expected.
Quick answer: Install the official Sender plugin, connect it with a Sender API token, enable tracking, assign separate groups for registrations and purchasers, then test a registration, abandoned cart and completed order before activating live automations. Keep WooCommerce order emails and Sender marketing emails as separate systems that share a verified sending domain.
Disclosure: I may earn a commission from qualifying purchases made through links in this article.
Sender for WooCommerce setup at a glance
- Create the Sender groups that match your consent and customer lifecycle.
- Generate a Sender API token and install the official WordPress plugin.
- Connect the plugin, enable tracking and choose the registration and purchaser groups.
- Set a branded From address and authenticate the sending domain.
- Test registration sync, guest checkout, abandoned cart and completed purchase events.
- Build one abandoned-cart workflow and one post-purchase workflow.
- Launch gradually, monitor event activity and investigate mismatches before scaling sends.
This guide takes you from installation through a controlled test. You will need administrator access to WordPress and an active Sender account. If you do not have one, create a free Sender account here before beginning.
What the Sender WooCommerce integration does
Sender’s official WooCommerce documentation lists four core capabilities:
- Transfer guest-customer email addresses
- Transfer registered-customer email addresses
- Use a Cart is abandoned automation trigger
- Use a Product is purchased automation trigger
The broader connection documentation also describes customer, cart and purchase data moving from the store into Sender so that ecommerce workflows can respond to behaviour.
| Store event | Expected Sender outcome |
|---|---|
| Customer creates an account | Email address is added to the selected registration group |
| Guest or customer completes a purchase | Customer is added to the selected purchaser group and a purchase event is available |
| Identifiable shopper leaves a cart | Cart-abandoned event becomes available to an automation |
| Customer completes the order | Purchase automation can start and an eligible cart flow should no longer continue |
Before you connect anything
Prepare these items first:
| Requirement | Why it matters |
|---|---|
| WordPress administrator access | Required to install and configure the plugin |
| Active WooCommerce installation | The Sender plugin extends WooCommerce rather than replacing it |
| Sender account | Provides the subscriber groups, automations and API token |
| Sender API token | Authenticates the WordPress plugin with your Sender account |
| Test product and checkout route | Lets you verify cart and order events safely |
| Test email addresses | Keeps test records separate from real customers |
| Consent decision | Determines which contacts are eligible for marketing versus transactional communication |
Do not treat a purchase as universal permission for promotional email. Configure the integration and your marketing groups to reflect the consent collected in your checkout, forms and applicable jurisdiction.
Set your WooCommerce email identity before automation
WooCommerce and Sender can both email the same customer, but they should not be treated as the same job. WooCommerce normally sends operational order notifications. Sender is the marketing and lifecycle layer that reacts to customer and ecommerce events. Define the responsibility of each before turning workflows on.
| Message type | Primary system | What to verify |
|---|---|---|
| New order, payment, refund and order-status notices | WooCommerce | Correct recipient, branded From address, reliable delivery and reply route |
| Welcome series, campaigns and promotions | Sender | Recorded marketing consent, suppression handling and unsubscribe link |
| Abandoned-cart reminders | Sender | Tracking, shopper identification, accurate cart link and purchase exit |
| Post-purchase education, review request or replenishment | Sender | Correct purchase event, sensible delay and exclusions for refunds or tests |
In WooCommerce > Settings > Emails, set the From name and From address to a mailbox on your store domain, not a public Gmail or Yahoo address. Then authenticate the same branded domain in the service that actually sends each message. SPF, DKIM and DMARC help receiving providers verify that the messages are authorised. Place a test order and send a Sender test campaign to confirm that both streams arrive as expected.
Do not disable WooCommerce transactional emails simply because Sender is connected. Keep essential order communication running until you have explicitly built, tested and documented an alternative for every message you intend to replace.
Step 1: create your Sender account and groups
Sign in to Sender and create the groups you want the integration to populate. A simple starting structure is:
- WooCommerce registrations for newly registered customer accounts
- WooCommerce purchasers for customers who complete an order
- WooCommerce marketing subscribers for people who explicitly consent to marketing
- WooCommerce test records for controlled setup checks
The exact structure depends on how your forms and checkout collect consent. Groups organise records. Dynamic segments can later select people based on activity, profile and ecommerce conditions.
Step 2: generate a Sender API token
In Sender, open Account settings > API access tokens and create a token for the WooCommerce connection. Copy it to a secure password manager while you complete the setup.
Treat the token like a password. Do not place it in an article, screenshot, shared document or support message unless the recipient is authorised to manage the integration. If you believe it has been exposed, revoke it and generate a replacement.
Sender maintains a current API-token authentication guide.
Step 3: install the Sender plugin in WordPress
In the WordPress dashboard:
- Open Plugins > Add New.
- Search for Sender.net email marketing.
- Confirm that you have selected the Sender integration intended for WooCommerce.
- Click Install Now.
- Click Activate after installation finishes.
Avoid downloading a plugin from an unofficial website. Use the WordPress plugin directory or the route linked from Sender’s current documentation.
After activation, a Sender.net section should appear in the WordPress administration menu.
Step 4: connect WordPress to Sender
Open the new Sender.net settings page in WordPress. Paste the API token generated in Sender and complete the connection.
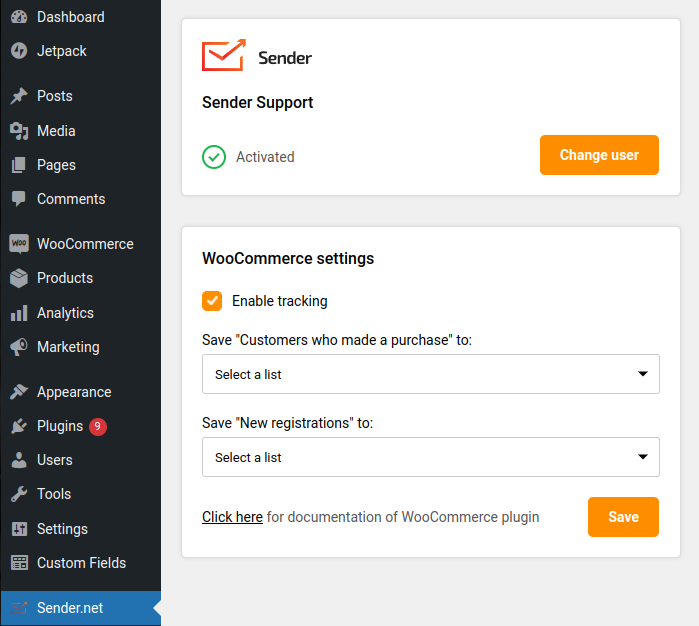
Actual interface screenshot from Sender’s official WooCommerce integration documentation. The interface can change, so follow the labels in your installed version.
Confirm that the integration reports a successful connection before continuing. If it does not:
- Check for accidental spaces before or after the token.
- Confirm the token has not been revoked.
- Confirm that outbound HTTPS requests from WordPress are not blocked.
- Check WordPress and WooCommerce system logs for a specific error.
- Generate a new token if the original may have been copied incorrectly.
Step 5: enable tracking
Turn on Enable tracking in the Sender plugin settings.
This setting is essential. Sender’s documentation says it enables the abandoned-cart and product-purchase triggers and transfers customer email addresses into Sender. Installing the plugin without enabling tracking does not complete the ecommerce setup.
Tracking should be assessed alongside your privacy notice, cookie or tracking controls, checkout wording and applicable consent requirements. Document what data is collected, for what purpose and how long it is retained.
Step 6: map customer records to the correct groups
The plugin provides options for records such as:
- Customers who made a purchase
- New registrations
Choose the appropriate Sender group for each option. Keep the logic explicit.
| WordPress event | Suggested group | Marketing permission? |
|---|---|---|
| Account created | WooCommerce registrations | Not automatically |
| Purchase completed | WooCommerce purchasers | Not automatically |
| Marketing box selected or signup form submitted | WooCommerce marketing subscribers | Yes, if the consent is valid and recorded |
| Test checkout | WooCommerce test records | No production sends |
This separation prevents an operational event from silently becoming a marketing subscription.
Step 7: verify the subscriber sync
Do not import your entire historic database before proving the connection.
Run two small tests:
Test A: new registration
- Open the store in a private browser window.
- Create a test customer account using a dedicated test email address.
- Open Subscribers in Sender.
- Search for the test address.
- Confirm that it appears in the registration group with the expected fields.
Test B: completed purchase
- Place a low-risk test order using your approved test-payment method.
- Complete the order through the status your integration treats as a purchase.
- Find the test customer in Sender.
- Confirm that the purchaser group and purchase activity are present.
- Check product, order and timestamp data that your intended automations require.
Record the results rather than relying on a successful connection message.
If you are starting from scratch, open a free Sender account and create your test groups before you build the first workflow.
Step 8: create an abandoned-cart automation
A WooCommerce abandoned cart email only works when the store identifies the shopper and sends the cart event to Sender. Treat the workflow as a conversion and customer-experience check, not just a reminder sequence.
In Sender:
- Open Automations.
- Choose Create new workflow.
- Start from a suitable template or create a workflow from scratch.
- Select Cart is abandoned as the starting trigger.
- Add a delay that matches your store’s buying cycle.
- Add the first reminder email.
- Add purchase-exit logic or confirm how Sender stops messages after an order.
- Add further reminders only when they remain useful rather than repetitive.
- Test the complete workflow before activating it for real customers.
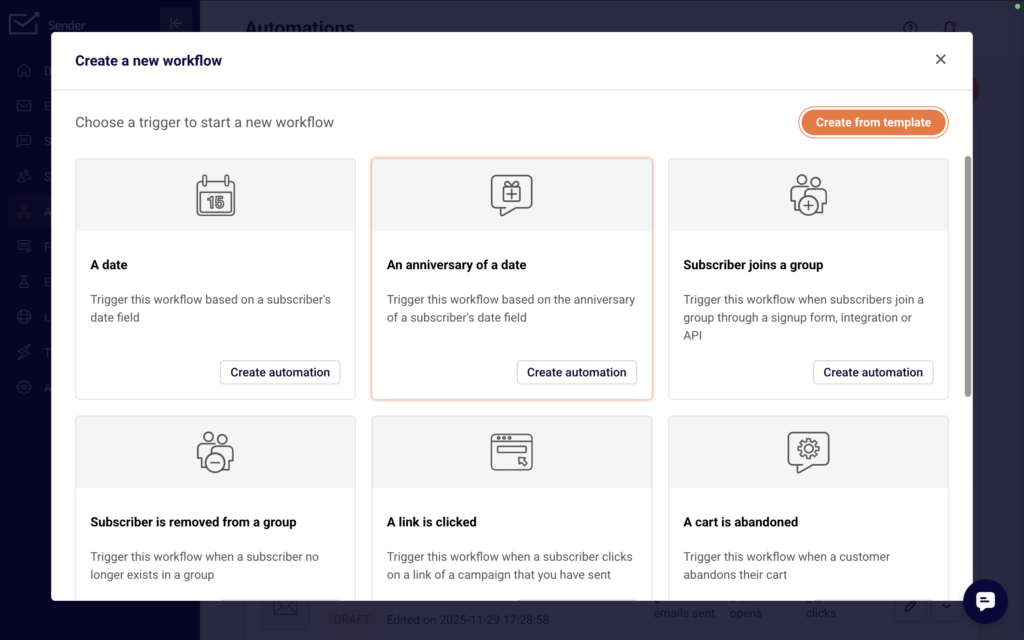
Actual interface screenshot from Sender’s official automation setup documentation.
A practical starting sequence might be:
| Timing | Purpose | Content |
|---|---|---|
| 1 to 3 hours after abandonment | Helpful reminder | Product image, cart link and support route |
| 20 to 24 hours later | Resolve hesitation | Delivery, returns, sizing, compatibility or common questions |
| 48 to 72 hours later | Final reminder | Clear expiry only if it is genuine; discount only if commercially justified |
Do not copy that timing without testing. A considered purchase and an impulse purchase have different decision cycles.
If you want to test these workflows without committing to a paid subscription, start with Sender’s free plan.
Step 9: test the abandoned-cart trigger
Use a private browser window and a test email address.
- Visit a product page.
- Add a product to the cart.
- Enter the email address through the point at which your store identifies the shopper.
- Leave without completing the purchase.
- Check the test subscriber in Sender for cart activity.
- Confirm that the contact enters the correct automation.
- Confirm that the product name, image, price and cart link are correct.
- Complete the purchase before the next message and verify that the remaining cart reminders stop.
That final step is critical. A cart email sent after purchase damages trust and exposes broken event logic.
Step 10: build and test a product-purchase workflow
Create another workflow using Product is purchased as the starting trigger. Suitable uses include:
- Product-specific onboarding
- Care or usage instructions
- Review requests after a realistic delay
- Replenishment reminders
- Cross-sell suggestions based on the purchased item
- VIP or repeat-customer routing
Run a controlled order and verify that the workflow uses the correct product and customer data. Exclude cancelled, refunded or test orders where your logic and available events allow it.
Step 11: authenticate your sending domain
An integration can work while the sending domain remains poorly configured.
In Sender, open Account settings > Domains and follow the records generated for your account. Sender currently documents SPF, DKIM and DMARC setup and displays verification indicators for each.
Important: a domain should not have two separate SPF records. If another service already appears in SPF, merge Sender’s authorised include according to the account instructions or ask the DNS administrator for help.
Use Sender’s current domain-authentication guide instead of copying DNS values from a screenshot or another business.
Step 12: complete a pre-launch test matrix
| Test | Expected result | Pass? |
|---|---|---|
| New registered account | Contact appears in the registration group | ☐ |
| Guest purchase | Contact and purchase data appear in Sender | ☐ |
| Registered purchase | Existing contact updates without an unwanted duplicate | ☐ |
| Abandoned cart | Correct product and cart details enter the workflow | ☐ |
| Purchase after abandonment | Remaining cart reminders stop | ☐ |
| Product purchase | Correct post-purchase workflow starts | ☐ |
| Unsubscribed contact | Marketing messages remain suppressed | ☐ |
| Domain authentication | SPF, DKIM and DMARC show the expected verified state | ☐ |
| Mobile email | Product and call-to-action remain usable | ☐ |
| Revenue attribution | Test order is attributed only when appropriate | ☐ |
Do not activate production automations until the important rows pass.
Common problems and fixes
| Problem | What to inspect |
|---|---|
| Sender menu does not appear | Plugin activation, administrator permissions and WordPress errors |
| API connection fails | Token accuracy, revocation, firewall rules and outbound HTTPS |
| Customer does not sync | Tracking status, selected group, event type and plugin logs |
| Cart trigger never fires | Whether the shopper was identified, tracking is enabled and the cart event reached Sender |
| Purchase trigger never fires | WooCommerce order status, integration logs and test-product data |
| Cart email arrives after purchase | Purchase event, exit conditions and workflow timing |
| Duplicate subscribers appear | Email normalisation, import history and group-versus-contact logic |
| Product image or price is wrong | Catalogue sync, variation data and cached product information |
| Test email lands in spam | Domain authentication, permission, content, reputation and test-recipient history |
Privacy and consent considerations
Technical capability is not the same as permission. A WooCommerce order can justify operational messages, but it does not automatically authorise every promotional campaign.
Review:
- Checkout consent wording
- Whether marketing consent is optional and recorded
- Privacy and cookie notices
- Unsubscribe and suppression handling
- Guest-cart tracking disclosures
- Data-retention practices
- Regional requirements for email and SMS
If you are uncertain about the legal basis for a workflow, obtain qualified advice for the markets in which you operate.
Is the Sender WooCommerce integration a good fit?
Advantages
- Official integration path
- Guest and registered-customer transfer
- Abandoned-cart and product-purchase triggers
- Accessible starting price and generous free plan
- One platform for campaigns, automations, forms and eligible SMS workflows
Limitations
- Event and field depth may be less extensive than a specialist ecommerce platform
- Historical order data and complex custom events need explicit verification
- Advanced automation or reporting can require a higher plan
- The integration still requires consent design, authentication and end-to-end testing
- Third-party plugins, caching and checkout customisations can create edge cases
Final checklist
- [ ] Create the necessary Sender groups
- [ ] Generate and securely store the API token
- [ ] Install and activate the official plugin
- [ ] Connect the plugin to Sender
- [ ] Enable tracking
- [ ] Map purchases and registrations to the correct groups
- [ ] Test registration and purchase sync
- [ ] Test an abandoned cart from capture through purchase exit
- [ ] Test the product-purchase workflow
- [ ] Authenticate the sending domain
- [ ] Verify consent and suppression behaviour
- [ ] Activate production workflows gradually and monitor results
When those checks pass, the integration is ready for a controlled launch. If you still need an account, create your free Sender account here.
Frequently asked questions
Does Sender work with WooCommerce?
Yes. Sender’s official WooCommerce plugin can transfer guest and registered customer email addresses and make Cart is abandoned and Product is purchased triggers available for automations. Install WooCommerce first, connect Sender with an API token and enable tracking before expecting ecommerce events to appear.
How do I connect Sender to WooCommerce?
Install the official Sender plugin from the WordPress directory, activate it, open the Sender.net settings area and paste a Sender API token. Complete the connection, enable tracking and choose the lists or groups used for new registrations and purchasers. Then run a controlled registration and order test.
Where do I find the Sender API token?
In Sender, open Account settings, then API access tokens, and create a token for the WordPress connection. Treat that token as a password. Do not add it to screenshots, public documentation or ordinary support tickets. Revoke and replace it if you believe it has been exposed.
Do I need to enable tracking in the Sender plugin?
Yes. Sender documents tracking as the setting that enables abandoned-cart and product-purchase automation triggers and transfers customer email addresses. A successful API connection without tracking is not a complete ecommerce setup.
Does Sender sync guest customers from WooCommerce?
Sender’s WooCommerce documentation lists guest customer email transfer as a core capability. A guest still needs to become identifiable at the relevant point in your checkout for an email record or cart workflow to be useful. Test a real guest checkout with a dedicated test address.
Can I send abandoned-cart emails through Sender?
Yes. Use the Cart is abandoned trigger after tracking is enabled. Make sure the workflow has a clear delay, accurate product and cart details, and a purchase exit. The purchase exit matters because a customer should not receive cart reminders after buying.
Why is my Sender abandoned-cart workflow not firing?
Check whether tracking is enabled, whether the shopper supplied an email address, whether the cart event appears on the contact record and whether the workflow is live with eligible entry conditions. Also inspect caching, checkout customisations and WooCommerce order status when events behave unexpectedly.
What is the difference between WooCommerce emails and Sender emails?
WooCommerce should remain responsible for core operational messages such as order, payment, refund and status notifications unless you intentionally replace them. Sender is better suited to consent-based marketing, abandoned-cart recovery and post-purchase lifecycle messages. Configure both with the same branded sending identity where relevant.
Do I need SPF, DKIM and DMARC for WooCommerce and Sender?
Yes. Authentication protects delivery and trust, and connecting the plugin does not configure it for you. Use a From address on your own domain, follow the DNS values shown by Sender and confirm WooCommerce or your delivery provider is also authorised to send for that domain. Send test orders and campaigns after DNS changes.
Can I add every WooCommerce purchaser to my marketing list?
Not automatically in every market. A purchase may justify transactional communication, but marketing eligibility depends on the consent you collected and the rules that apply to your customers. Keep purchasers, registrations and explicitly opted-in marketing subscribers in distinct groups or segments.
Will Sender import all historical WooCommerce customers?
Do not assume that a new connection imports every historical record or order event in the exact format you need. Confirm current plugin behaviour in your installed version. If you need a historic import, prepare a consent-aware file, map fields deliberately and test a small batch before importing more records.
How do I test Sender before switching on live automations?
Use dedicated test email addresses and a low-risk test product. Test a new account, a guest purchase, an abandoned cart and a completed purchase. Check the corresponding Sender contact activity, groups, event data, message content, mobile rendering, unsubscribe behaviour and cart-workflow exit after purchase.